Quick Overview
When assembling parts, creating and editing meshes and setting-up simulations, NX tools are often used repetitively. Even though all tools are easily accessible via the top menu and ribbon bar, you can improve your productivity by customizing your keyboard shortcuts and application radial toolbars to get one-click access to your favorite functions.
This Tips & Trick will show you how to adapt your NX interface accordingly.
Radial Toolbars Customization

There are 3 application-dependent radial toolbars that can be customized. The modifications you make will apply to the application you are in.
To be able to customize radial toolbars, the Allow Menu Bar Customization check box must be selected in the Customer Defaults:
File tab → Utilities → Customer Defaults → Gateway → User Interface → General tab.
The description of the customization procedure can be found in in NX help under:
Home→ Fundamentals →NX Interface → Radial toolbars and radial shortcuts → Modify radial toolbars
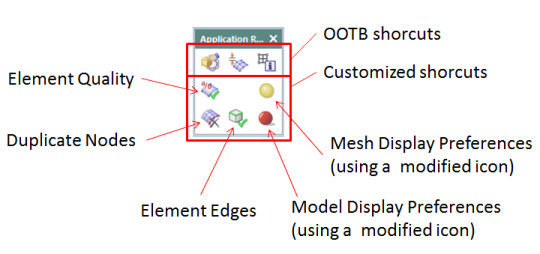
Here’s an example of a custom radial toolbar 3 in the Advanced Simulation/FEM application:
Keyboard Shortcut Customization
Many out-of-the-box (OOTB) keyboard shortcuts are a combination of 3 keys which are impossible to click using one hand. The goal is to assign only one key to functions, allowing your hands to remain on the mouse and keyboard while performing these repetitive actions.
For example, you can define some Show and Hide functions like this:
• Immediate Hide = “H”
• Show Only = “O”
• Show Adjacent = “A”
Contrary to radial toolbars, you can choose to set these shortcuts in either all global or specific applications (when the function is available, of course).
The description of the keyboard shortcut customization procedure can be found in NX help under:
Home→ Fundamentals → Customizing the NX environment → Customizing your environment → Customizing Ribbon bar, toolbars, and menus → Assign a shortcut key to a command